
Introduction to Christmas Kitchen Sink Cookies
Why Christmas Kitchen Sink Cookies are a Holiday Favorite
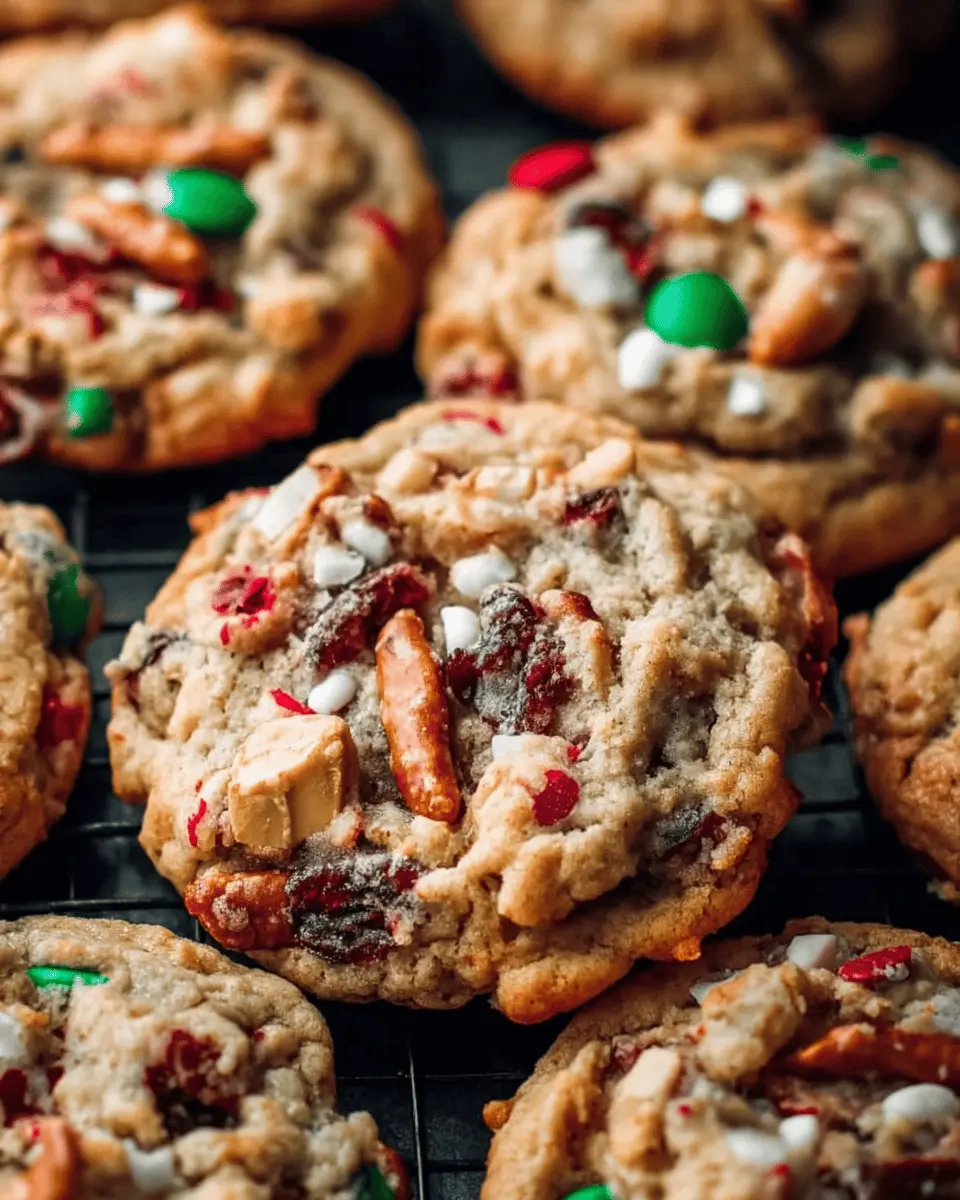
Christmas Kitchen Sink Cookies have become a must-have treat during the holiday season, and it's easy to see why! Imagine biting into a cookie that boasts a delightful mix of flavors and textures — sweet, salty, chewy, and crunchy all at once. These cookies are like a festive celebration in every bite, perfect for family gatherings or cozy evenings at home.
What sets these cookies apart is their unique combination of ingredients. By including everything from M&M’s and white chocolate chips to pretzel pieces and even potato chips, they offer a fun spin on traditional cookies. This delightful variety not only satisfies your sweet tooth but also adds that savory crunch that enhances the overall experience.
Moreover, baking these cookies is a chance to unleash your creativity! You can customize them with your favorite mix-ins, making them a versatile option for everyone. Whether you prefer to stick with the classic red and green decorations or experiment with other toppings, each batch will feel like a one-of-a-kind creation.
If you’re looking to bring a little joy and cheer into your home this holiday season, these Christmas Kitchen Sink Cookies are the way to go. So gather your ingredients and join in on the festive fun!

Ingredients for Christmas Kitchen Sink Cookies
Essential ingredients for the perfect cookie
Creating delicious Christmas Kitchen Sink Cookies starts with a solid foundation of essential ingredients. Here's what you'll need:
- Salted butter: ¾ cup, softened for a rich flavor
- Light brown sugar: ¾ cup, packed for that classic caramel note
- Granulated white sugar: ¼ cup for sweetness balance
- Egg yolks: 2, at room temperature for a rich texture
- Vanilla bean paste or extract: 2 tsp, adding warmth and depth
- All-purpose flour: 1 ½ cups, spooned and leveled for the perfect dough consistency
- Baking powder, baking soda, and salt to help those cookies rise and get that delightful chew
Optional add-ins for extra flavor and fun
While the essentials are key, the true magic of Christmas Kitchen Sink Cookies comes from the fun add-ins! Feel free to mix and match:
- Red and green M&M's: ½ cup for a festive touch
- White chocolate chips: ⅓ cup for a creamy sweetness
- Pretzel pieces: ⅓ cup for that savory crunch
- Potato chip pieces: ⅓ cup to add a surprising salty bite
- Red and green jimmies: 2 tablespoon for a pop of color
These delightful extras not only enhance the flavor but also make your cookie creations visually stunning! What will you add to your batch?
Preparing Christmas Kitchen Sink Cookies
Baking is one of the best parts of the holiday season, and what could be more festive than whipping up a batch of Christmas Kitchen Sink Cookies? These cookies are a delightful fusion of sweet and salty flavors—perfect for sharing with friends and family. Let's dive into the process of making these crowd-pleasers!
Step 1: Preheat and prepare your baking sheets
Before you get too carried away with the mixing, start by preheating your oven to 350 degrees Fahrenheit. This ensures that your cookies will bake evenly. While the oven is warming up, line two baking sheets with parchment paper. This not only prevents sticking but also makes for an easy cleanup. If you fancy a non-stick baking spray, that works wonders too!
Step 2: Creaming the butter and sugars
Next, grab a large mixing bowl and combine ¾ cup of softened salted butter, ¾ cup of light brown sugar, and ¼ cup of granulated white sugar. Using an electric mixer, cream the butter and sugars for about two minutes until the mixture becomes light and fluffy. This crucial step adds air to the dough, resulting in deliciously soft cookies.
Step 3: Mixing in the egg yolks and vanilla
Once your butter-sugar mixture is fluffy, it’s time to add the two egg yolks and 2 teaspoons of vanilla bean paste (or extract, if that's what you have on hand). Beat them in on medium speed for another two minutes. You’ll notice the mixture turning pale and airy—this is when you know you’re on the right track!
Step 4: Combining dry ingredients
In a separate bowl, whisk together 1 ½ cups of all-purpose flour, ½ teaspoon of baking powder, ½ teaspoon of baking soda, and ½ teaspoon of salt. Gradually add this dry mix to your creamed mixture, stirring until just combined. Be careful not to overmix here; we want those cookies to stay tender.
Step 5: Folding in the colorful mix-ins
Here comes the fun part! Gently fold in ½ cup of red and green M&M's, ⅓ cup each of white chocolate chips, pretzel pieces, and potato chip pieces, as well as 2 tablespoons of red and green sprinkles. This is where your cookies earn their "kitchen sink" name!
Step 6: Scooping and arranging the dough
Use a cookie scoop to portion out your dough into 20 balls. Make sure to space them about two inches apart on your prepared baking sheets. For that extra festive touch, you might want to sprinkle a few additional mix-ins on top of each dough ball before baking.
Step 7: Baking to perfection
Pop those sheets in the oven and set your timer for about 10-12 minutes. Keep a close eye on them—if you prefer chewier centers, aim for the 10-minute mark, but if you like crispy edges, let them go the full 12 minutes.
Step 8: Cooling and shaping the cookies
Once you've pulled your Christmas Kitchen Sink Cookies from the oven, let them cool on the baking sheets for five minutes before transferring them to a wire rack. If you want your cookies to have a perfectly round shape, use a large circular cookie cutter to gently swirl around them while they're still warm. That’s the secret to an Instagram-worthy treat! After cooling for another 10 minutes, they’re ready to enjoy.
These cookies are sure to be a hit at your holiday gatherings, so gather your ingredients and start baking! For more delectable recipes, check out some festive cookie ideas from Food Network. You’ll never run out of inspiration this season!

Variations on Christmas Kitchen Sink Cookies
Festive Variations for Different Tastes
The beauty of Christmas Kitchen Sink Cookies lies in their versatility! Consider these delightful variations to cater to your unique taste buds:
- Nutty Additions: Toss in chopped pecans or walnuts for added crunch.
- Fruit Twist: Dried cranberries or chopped apricots bring a fruity burst that complements the sweetness.
- Spicy Kick: Add a pinch of cinnamon or nutmeg for that extra warmth during the holidays.
These ideas can easily elevate your cookie game! For more inspiration, check out Baker's Review.
Allergy-Friendly Options for Inclusive Baking
Baking for friends or family with allergies? No problem! You can easily adapt your Christmas Kitchen Sink Cookies:
- Gluten-Free: Swap out the all-purpose flour for a 1:1 gluten-free blend.
- Dairy-Free: Use coconut oil or dairy-free butter instead of regular butter.
- Nut-Free: Replace nuts with sunflower seeds for that crunch without allergens.
With these substitutions, every holiday gathering can enjoy your delicious creations!
Baking notes for Christmas Kitchen Sink Cookies
Key tips for achieving cookie perfection
Baking is as much an art as it is a science, and when it comes to making Christmas Kitchen Sink Cookies, following the right tips can transform your batch into something spectacular!
-
Measure your flour carefully: This can’t be overstated. Using a scale or the spoon-and-level method ensures you aren’t using too much flour, which leads to tough cookies. Aim for about 125 grams per cup.
-
Don’t skip the paddle step: Creaming the butter and sugars until fluffy is crucial for texture. This aeration helps your cookies rise beautifully.
-
Experiment with mix-ins: Feel free to swap in your favorite treats or snacks. Leftover chocolate chips, nuts, or dried fruits can add unique twists!
Remember, baking should be fun! Embrace your creativity while making these festive delights. For more specific baking tips, check out resources like King Arthur Baking.
Serving suggestions for Christmas Kitchen Sink Cookies
Creative ways to present your cookies
Transform your Christmas Kitchen Sink Cookies into a festive centerpiece by arranging them on a decorative platter adorned with holiday-themed garnishes. You can use a mix of pinecones and cinnamon sticks for a cozy, rustic look. Individual treat bags tied with colorful ribbons make delightful favors for guests, too! Personalize each bag with a fun note about the cookie ingredients to spark conversations.
Best pairings for holiday gatherings
These cookies are wonderfully versatile! Pair your Christmas Kitchen Sink Cookies with a rich hot chocolate or a refreshing peppermint tea for a cozy treat. For a more adult-friendly option, consider serving them alongside some spiced apple cider. For a delightful sweet and savory combo, have a cheese board filled with soft cheeses and seasonal fruits like pears or apples to balance the cookie's richness.
By presenting and pairing your cookies thoughtfully, you’re sure to impress your guests this holiday season! For more ideas on holiday treats, check out Food Network’s collection of festive recipes.
Cooking tips and notes for Christmas Kitchen Sink Cookies
Preventing overbaking and ensuring chewiness
Baking Christmas Kitchen Sink Cookies is all about balance, especially when it comes to texture. Here are some tips to maintain that delicious, chewy center without crossing into overbaked territory:
-
Monitor baking time closely: Start checking the cookies at the 10-minute mark. For a soft, chewy center, pull them out when the edges are lightly golden but the center looks slightly underbaked. This way, they’ll continue to set as they cool.
-
Use a cookie scoop: Consistent sizing is crucial. Using a cookie scoop helps ensure even baking, so you won’t have some cookies burned while others are raw.
-
Don’t skip the cooling time: Allow your cookies to cool on the baking sheet for five minutes before transferring them to a wire rack. This helps maintain their soft texture.
By following these tips, you'll achieve perfectly chewy Christmas Kitchen Sink Cookies that delight everyone at your holiday gathering! For more baking insights, check out sources like King Arthur Baking for expert advice.
Time breakdown for Christmas Kitchen Sink Cookies
Preparation time
Making your Christmas Kitchen Sink Cookies begins with just 15 minutes of prep work. It’s all about mixing the butter and sugars, followed by the rest of the ingredients, and getting everything ready for the oven.
Baking time
Once you've prepared the cookie dough, it’s time to bake! The cookies usually take between 10 to 12 minutes in the oven - perfect for when you want a warm, gooey treat without too much wait.
Total time
In total, you’ll need about 25 to 27 minutes from start to finish before you can indulge in these delightful cookies. Truly, the perfect holiday treat that’s quick to make and even quicker to disappear!
For more holiday baking inspiration, check out Food52 for delicious cookie recipes!
Nutritional Facts for Christmas Kitchen Sink Cookies
Calories
Each delightful Christmas Kitchen Sink Cookie contains approximately 150 calories. Perfect for indulging during the festive season, these cookies offer a sweet treat that won't ruin your holiday spirit!
Sugar Content
With about 10 grams of sugar per cookie, these cookies strike a balance between sweet and savory. It's a delightful mix that satisfies your sweet tooth while also being a fun treat to share with family and friends.
Key Nutrients
These cookies provide essential nutrients, thanks to the mix-ins like nuts and chocolate. The combination of white chocolate chips and pretzels not only adds flavor but also contributes small amounts of protein and fiber, making each cookie a little more than just a guilty pleasure! For a better understanding of your daily sugar intake, you can refer to guidelines from the American Heart Association.
Incorporating these festive Christmas Kitchen Sink Cookies into your holiday gatherings adds not just joy but a little nutrition too! Enjoy baking and sharing these crowd-pleasers with your loved ones.
FAQs about Christmas Kitchen Sink Cookies
What can I substitute for butter in this recipe?
If you're looking to replace the butter in your Christmas Kitchen Sink Cookies, options like coconut oil or unsweetened applesauce can work wonders. For a more neutral flavor, you can use vegetable shortening or margarine. Just ensure that any alternative you choose is softened, similar to the butter’s consistency, for the best results in your cookie dough.
How can I store my cookies for freshness?
To keep your cookies fresh and delicious, store your Christmas Kitchen Sink Cookies in an airtight container. This helps prevent them from becoming stale. For the best taste, consume them within three days. If you’d like to preserve them longer, consider freezing!
Can I freeze Christmas Kitchen Sink Cookies?
Absolutely! Freezing your Christmas Kitchen Sink Cookies is a great way to keep them tasty for future snacking. Let them cool completely, then place them in a freezer-safe container or a zip-top bag. They should maintain their flavor and texture for up to three months. When you're ready to enjoy them, just thaw at room temperature!
Conclusion on Christmas Kitchen Sink Cookies
Why These Cookies Are a Must-Have This Holiday Season
This holiday season, Christmas Kitchen Sink Cookies are simply irresistible. With flavorful combinations of sweet and salty ingredients, they deliver that perfect crunch while being a feast for the eyes. Cookies packed with treats invite everyone to gather around, making them a festive delight. Plus, they're easy to share—ideal for holiday parties!

Christmas Kitchen Sink Cookies
Equipment
- electric mixer
- baking sheets
- parchment paper
- spatula
- Cooling Rack
- Cookie cutter
Ingredients
- ¾ cup salted butter softened
- ¾ cup light brown sugar packed
- ¼ cup granulated white sugar
- 2 large egg yolks at room temperature
- 2 teaspoon vanilla bean paste or extract
- 1 ½ cups all-purpose flour spooned and leveled
- ½ teaspoon baking powder
- ½ teaspoon baking soda
- ½ teaspoon salt
- ½ cup red and green M&M's
- ⅓ cup white chocolate chips
- ⅓ cup pretzel pieces
- ⅓ cup potato chip pieces
- 2 tablespoon red and green jimmies
Instructions
- Preheat oven to 350 degrees. Line two baking sheets with parchment paper and set aside.
- Add softened, salted butter, light brown sugar, and granulated sugar to a large bowl. Cream the butter and sugars together with an electric mixer for two minutes, or until light and fluffy.
- Next, add in egg yolks and vanilla and mix on medium speed for two minutes, or until the mixture is pale in color and fluffy.
- Then add in flour, baking powder, baking soda and salt. Mix until combined.
- Add in the M&M's, white chocolate chips, pretzel pieces, potato chip pieces and sprinkles. Gently fold in with a spatula until everything is combined.
- Scoop the dough into 20 balls. Arrange two inches apart on the prepared baking sheets.
- *Optional* Add a few extra mix-ins on top of the scooped cookie dough balls. This will give you cookies as pictured. This is totally optional, but I think it makes the cookies look cute!
- Bake for 10-12 minutes. (10 for chewier centers, 12 for crisper edges.)
- *Optional* When the cookies are straight out of the oven, use a large circular cookie cutter to give them a perfect shape. Do this by swirling the cookie cutter around each cookie. This will help to push everything together into a perfect circle!
- After baking, let the cookies cool on the baking sheets for 5 minutes. Then transfer to a cooling rack to cool for another 10 minutes.
- Store leftovers in an air tight container for up to three days.


Leave a Reply